“… easily customizable, content-rich, maintainable forms” I should have added as well, right? For building “just” forms and surveys in Drupal 8 is not the real challenge (you always have the Contact module “up your sleeve” for that). Building robust, “tweak-able” web forms and, moreover, forms that even editors and themers can tweak and that site builders can create right in the UI, now that's the true dare! The test that we'll be putting the Drupal 8 Webform module to in this tutorial here!
Introducing: The Drupal 8 Webform Module, Once The YAML Form!
That's right, Webform is the rewritten version of the YAML Form for Drupal 8.
Since the YAML Form was so much “developer-centric” and, therefore, not the “ideal” enterprise form builder (creating and editing forms used to be exclusively developers' job; they would “get their hands dirty” in the YAML source code), a new “builder” and submission manager for Drupal 8 was greatly needed.
One that would empower suite builders and themers, as well, to easily create and customize powerful forms!
And so, Webform for Drupal 8 was created. Suitable for building both basic and multi-page, highly customizable forms, it:
- got equipped with a user-friendly UI
- no longer limits the user (be it developer or suite builder) to write custom code whenever he needs to do some “tweaking”
- comes packed with more pre-built functionality
And now, let's go through some of its main use cases:
- To build a brand new form or to duplicate an existing form template
- To collect and to manage submissions
- To publish the newly created forms as nodes, pages or blocks
- To review online submissions
- To send out confirmations and email notifications
Webform, The Original Form Builder in Drupal, vs Webform for Drupal 8
“Has Drupal 8 made any changes to this long-standing Drupal module?”, you might be asking yourself right now.
“It sure has!” Take for instance the fact that:
- it comes with a completely different code base
- its approach to creating forms is different from the one that you might be already familiar with from Drupal 7
And there's more! More changes that have been applied to the Drupal 8 Webform module in order to meet some “stringent” needs that the YAML Form or Contact module couldn't meet (e.g. that site builders should be able to easily build forms without entering the source code or that more APIs should be added):
- it's got an extended core API (Plugins, Config Entities, FAPI etc.) enriching its features “collection”
- it enables you, the user (whether you're a Drupal developer in Canada or a site builder) to engage in never-ending re-factoring, in writing multiple tests, OO design patterns etc.
Bottom line: by far the most important 2 changes brought to Webform for Drupal 8 are the user-friendly UI that it got equipped with (that site builders now get to use for building new forms) and the extended API powering a whole lot of “customization scenarios”.
In other words: It's true that you do get a new form “in the blink of an eye” using the Contact module, yet it's an easy-to-tweak customer-facing form that you get when using Drupal 8's version of Webform. Think long-term!
The Drupal 8 Webform Module: Who's It For?
Who'll be most excited about this new version of Webform? How do its new features meet the needs of each “role” within a company?
- developers: they get to create and edit forms quick and easy, right in the YAML source code
- site builders: they get empowered to build any type of web forms and to customize them choosing from all the form elements put at their disposal, right in the module's UI
- themers: they get to style the forms' layouts and elements to their liking
- site/business owners: they benefit from the fact that their teams get enabled to build/edit forms a lot faster and more cost-effective; in addition, they're also facing a “wealth” of new possibilities for building rich content forms that easily integrate with multiple APIs and systems
Building Powerful, Customizable Forms Using The Drupal 8 Webform Module
1. Install the Module(s)
First things first: tick off the “Webform” module, from the list of modules unfolding on your screen, along with the “Webform UI” module (and I strongly recommend, especially if this is the first “test drive” that you run on the Drupal 8 Webform module, to tick off the Webform Templates, the Webform Demo: ApplicationEvaluation System and the Webform Examples modules, as well)
2. Access Webform
Go to Structure> Webform
It's there that you have access to all the web forms on your Drupal site. For now, you only have a basic email “Contact” web form there. Give it a click!
3. Build Out Your New Form
Just hit the “+ Add Webform” button there and enter a name for it in the pop-up screen opening-up!
4. Add Form Elements
Note: in this Drupal 8 form builder “form fields” are called “form elements”.
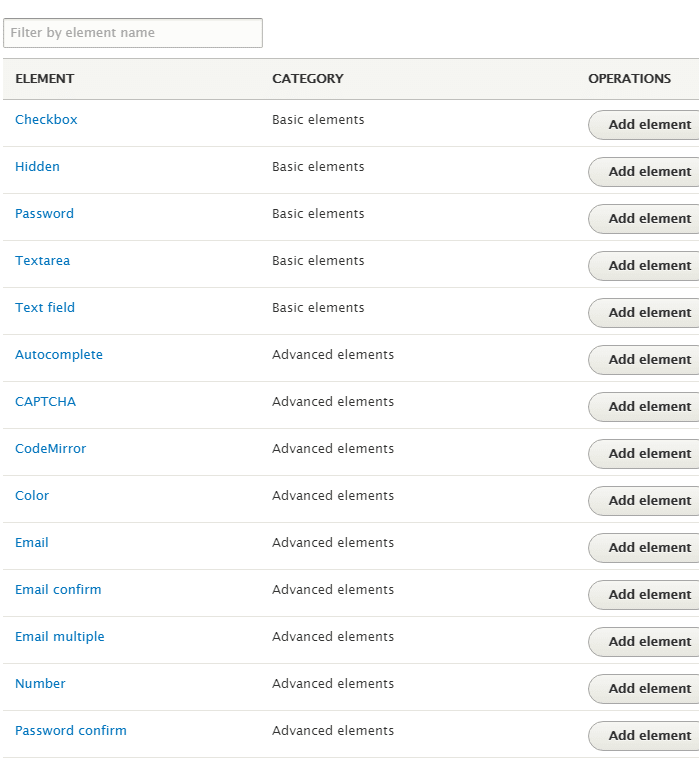
So, let's add some fields to our newly created web form: click the “+ Add elements button”!

From the newly opened pop-up feel free to pick the elements that you'd want to “populate” your web form with: name, address, phone, password, email, name etc.
Note: the “Name” field is actually a “collection of predefined fields”, so expect to be asked to go through a separate round of field selections for this particular form element: middle, first, last, suffix, degree etc.
Once you've added all the planned out elements/fields to your new form, just... submit your form. As simple as that!
5. Add Multiple Pages to Your Form
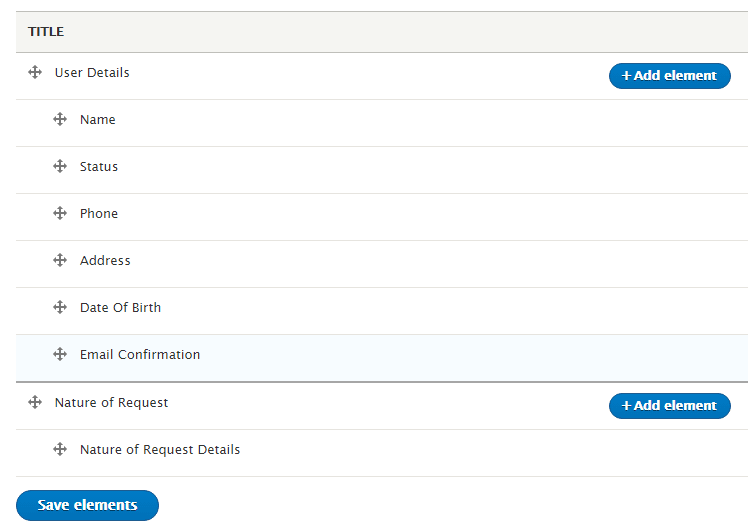
Go back to your contact form and hit the “+ Add Page” button this time.

This will instantly create a page break into your web form (adding, also, the needed navigation to it, as well).
Once in the “Add Element” wizard page pop-up simply select the fields that you want to be displayed on each one of your form's pages: Name Details, Contact details etc.
Note: just indent specific fields, from those that you're presented with, and you'll be instantly adding them to a specific page in your web form!
6. Use Conditionals to Show/Hide Fields
Now, this is where (a great part of) the Drupal 8 Webform Module's “magic” comes from: you're no longer constrained to run custom JavaScript code if you want to conditionally display certain fields on your web form!
It's nothing more than out-of-the-box custom logic that you need to add to your form!
Go to your contact form once again and click the “Edit” button next to that particular field that you want conditionally displayed in your form (it could be the email address or the phone number etc.). Let's say that it's the "Email" field that you want to edit!
- In the “Edit Email Element” pop-up screen just scroll down to the “Conditional Logic” section of the page and
- Pick your form element's “State” (visible, invisible, disabled, required etc.)
- Pick your “Element/Selector” from the neighboring drop-down menu (e.g. “Contact method (Radios)”
- Select the “Trigger” from the next drop-down (e.g. “Value is”)
- Enter email in the “Value” tab
- Hit “Save”
Note: try a “test scenario” where your form displays the phone number field and the email field alternatively!
7. “Play Around” With Form Settings
Another great thing about the Drupal 8 Webform module, adding up to its increasing popularity, is its heavy load of settings options!
And there sure are... PLENTY! At your disposal to dig them through and to test them around.
Just click on the “Settings” menu tab on top of your Contact form page (it's right after the “Source (YAML)” menu tab) and then... feel free to “play around” and to tweak your form's layout to your liking!
Warning: do keep in mind to always test new form settings locally first!
8. Add Email Notification to Your Form
Let's imagine this scenario here: you've just built out your new form, using the Drupal 8 Webform module, got it fully customized, and now you want to add email notification to it, as well!
How you do that?
You go to the “Emails/Handlers” menu tab this time (it's right next to the “Access” menu tab) and in the “Add email handler” pop-up window you:
- specify (from the “To email” drop-down menu) that the notification should be sent to your company email
- enter your email's body text
- edit the subject
- click “Save”
Hit the “Save handlers” button, as well, and you're done!
Of course, the list of customization and tweaking that you can engage in, as you build your form with Webform for Drupal 8, is almost an endless one. And that's the “beauty” of this module: you get all the tools you need for customizing your web form right out-of-the-box!
There's no need to write any custom code to have your form looking and working precisely as you want it to!