“Empower the end user!” are not just some big words in Drupal. And in this scenario here the “empowered Drupal user” is the author uploading images on a website straight from the CMS. How do you empower him/her as the Drupal developer building that website? Well, this is precisely what I'll share with you in today's post: how to set up an automated image optimization process; a Drupal ImageAPI Optimize-centered one.
Where the images about to be optimized are those that content editors will upload.
As compared, of course, to those that you, the developer, will have already optimized while working on the given website's front-end.
In short: this is a step-by-step guide on how to take a heavy burden off the authors' shoulders by making the images that they upload optimize themselves... automatically.
All this by harnessing the Drupal ImageAPI Optimize module's power — a toolkit of multiple image compression tools — and setting up an automated image compression process.
And here it goes:
1. Drupal ImageAPI Optimize Toolkit: Choose Your Image Compression Tools
Before “attacking” images, stopping them from getting too bulky, you need to... choose your “weapon”, right?
And this can get a bit challenging when you have 2 types of “ammunition” at your disposal: local and 3rd party image compression toolsfith.
Should you go for a PNGCrush & JpegOptim “combo” or maybe for a PngQuant & JpegOptim mix instead?
There's no point in turning it into a guessing game: run one of your images through all the compression tools at your disposal (both for jpeg and png) and see which ones reduce its size the most.
In other words: check the percentage saving that each compression tool provides.
2. Configure Your Automated Image Compression Pipeline in Drupal 8
Getting the whole image optimization in Drupal automated is our main goal here. Therefore, setting up optimization pipelines and integrating them with your image styles becomes crucial.
How do you do this?
Once you have the Drupal ImageAPI Optimize module installed, go to the pipeline configuration page — Configuration > Media > Image Optimize pipeline — and add your brand new pipeline.
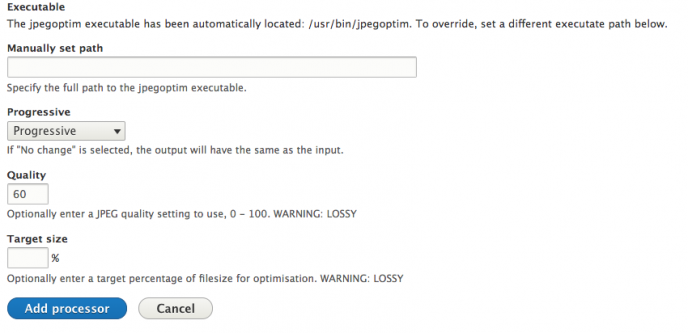
Next, go ahead and add the 2 image compression tools that you will have already chosen.
Note: if they're already installed on your server, the module should “detect” their location automatically.
Another note: if one of your chosen compressors is JpegOptim, make sure to go for the right “Quality” settings.

Now once you head back to your Image Optimize pipelines config page you'll see your newly configured pipeline set as your sitewide default one:

And there you have it! Author-uploaded images getting automatically compressed sitewide.
3. How to Override The Automated Pipeline for Particular Images Only
There will be exceptions, too. Situations where your sitewide default image compression pipeline turns out to be a bit too aggressive/conservative for certain image styles.
So, in these “exceptional” cases you'll need to override it right in the Image Styles configuration: Configuration > Media > Image styles.
Just edit that particular image style and choose the alternative pipeline to attach to it.
4. How to Automatically Compress Existing Images, As Well
“And how about the “older” images?” The ones already existing on the given website?
“How can I automatically optimize those, as well?"
A truly legitimate question. Luckily, the answer is nothing but a simple drush command:
drush image-flush –allBy flushing the image cache, you'll practically restore the existing images as already compressed the next time they get loaded.
5. How Does Automated Compression Work With Responsive Images?
Another valid question that I anticipated.
“Seamlessly” is the answer here. The Responsive Images takes its variants right from the Image Styles, where they're already compressed.
Also, it's worth mentioning that you get to:
- configure your image dimensions and cropping in the image style, first things first
- and have the default compression pipeline applied after that
6. 4 Other Image Optimization Methods in Drupal
For Drupal ImageAPI optimization (Or Image Optimize) is not the only resource you can tap into for reducing the image size and boosting a site's performance.
It's just the best solution for author-uploaded images, in particular. For setting up an automated image optimization process to ease the life of all those end users in charge with uploading images via the CMS.
Besides this particular use case, there are other methods for compressing images in Drupal. To list just 4 of them:
a. “Lazy” images
Probably one of the most popular techniques for quickly improving a site's performance: making the images “lazy”. Meaning that the Drupal site will get to upload them only when/if they're being requested.
Only when/if they show up in the site user's view on the page that he/she's scrolling.
And there's a whole “ecosystem” of modules leveraging the “lazy” images technique: Image Lazyloader, Node Lazyloader, Jail...
b. CSS sprites
Here's another ingenious method of reducing the image load and speeding up a site's rendering process: organizing images into CSS sprites.
This way, you'll have multiple images served in one single HTTP request. Which translates into boosted front-end performance!
Wondering which Drupal modules capitalize on this image optimization method? CSS Sprite generator and Spritesheets!
c. Base64
Which is an encoding format, in fact. One that you can put your images into and thus embed them right into your CSS.
The result? Zero requests!
Note: do keep in mind that although you're reducing the number of HTTP requests sent to the server, the image files thus formatted will turn out a bit larger!
d. Responsive images
Another module “rivaling” the Drupal ImageAPI Optimize is the Picture module, in Drupal 7. A module whose functionality has been moved to core in Drupal 8.
- optimize images in Drupal
- put together an automated image optimization process having the Drupal ImageAPI optimize module as the “core” Drupal toolkit to leverage
- lighten the “burden” of all those authors in charge with image uploading tasks via the site's CMS