You can't be talking about a rich and convenient shopping experience for your customers on your Magento store without a variety of specific attributes added to each one of your products, right? Attributes that your store guests can unfold, scan through and select from. And which get your products from simply "generic" to... perfectly fitting your customers' requirements. Now speaking of Magento 2 product attributes: how do you create them?
How do you manage them and apply them to specific products in your e-store?
And, by "product attributes", I do mean custom ones, as well, in addition to the standard ones: name, description price.
Now, before I go on with this Magento 2 tutorial on creating and adding product attributes, I just wanted to add that there's also another way of handling them: programmatically. That if you want to create yours in a particular way.
You can do that, as well, just that I'm not going to tackle that method in this tutorial here.
And now, let's break down further and delve right into this step-by-step guide that I've put together for you:
But What Are the Magento 2 Product Attributes More Precisely?
It's that... block associated with a given product in a catalog that customers can scan through and thus select from all the characteristics (size, color, brand, style etc.) listed there.
The great news is that, as a store admin, you get to create and to apply as many product attributes in Magento 2 as needed. Right from its configuration:
- either from the Stores menu
- or right from that specific Product Detail page
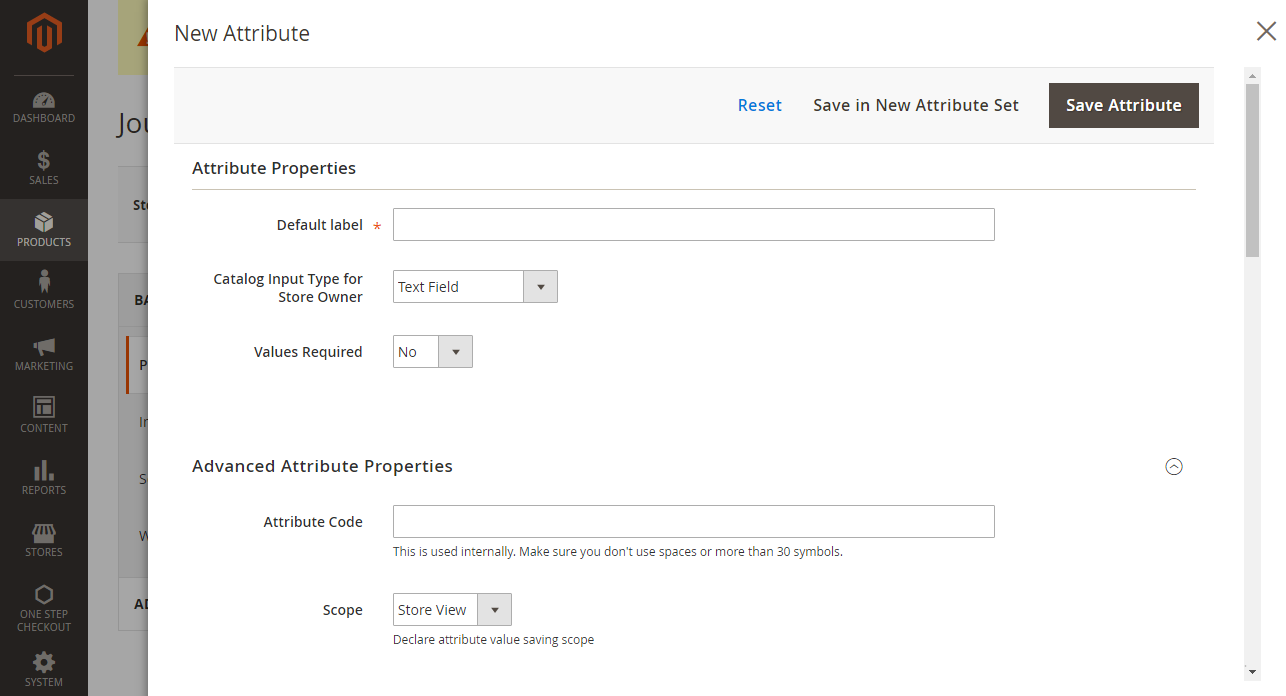
Note: keep in mind that each attribute will only accept one type of input that you'll define in your Magento store's settings!
Another note: besides enriching your customers' shopping experience, product attributes are also valuable as search parameters and filtering criteria in case of a layered navigation (promotions and product comparison reports).
Step 1: Create the Brand New Attribute
Now, let's get to the very purpose of this “how to” tutorial here: pointing out the steps to take for creating and applying product attributes in Magento 2!
For creating these product characteristics, you'll need to:
- navigate to your Admin Panel
- go to Product > Inventory > Catalog
- click on the Edit link (it's right there, on the Product Detail page)
- then hit the “Add Attribute” button
And there are 2 possible scenarios here, that call for 2 different approaches:
- you might want to use one of the already existing attributes, for which you just type its name in the search box or select it from the drop-down menu
- you might want to create a whole new attribute and add it to your product; for this, you'll choose the “New Attribute” option and go through the next steps
Note: you get to reach the New Attribute page right from your Admin Panel, as well; just navigate to Store > Attributes > Product and hit the “Add New Attribute” button
Step 2: Enter The Basic (and Advanced) Information/Properties
Now it's time to assign basic properties to your product attribute.
- you first insert the “Default Label”, a name that will describe/identify the attribute
- next, you'll need to choose the input type from the given list, and you'll be doing this selection in the “Catalog Input Type for Store Owner”. An “input” whose role is to describe the type of data that the attribute should show (for instance, a text field, for manually entering the value of each one of your products)
- as for your Dropdown and Multiple select, you'll need to define the options
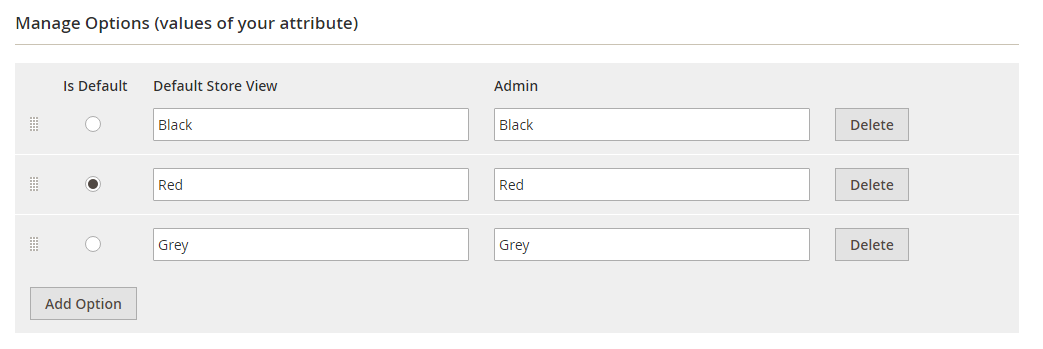
- For this, just click the “Add option” button in the bottom left corner of your Manage Options screen
- Choose the first value displayed in your list; in case you have multiple store views, select different values for each one of them, whereas if it's just one store view, the Admin value will apply the value, by default, to the storefront
- Click the “Add Option” and go through the same steps for the next properties that you wish to apply to your attributes
- Remember to check the “Is Default” box in case you want to use the chosen option as a default one
- Click Yes for the “Value Required” if you want customers to be asked to make their option selections before they complete their purchases
In addition to the basic properties that you can apply to your product attributes in Magento 2, there are the optional, advanced ones, as well. 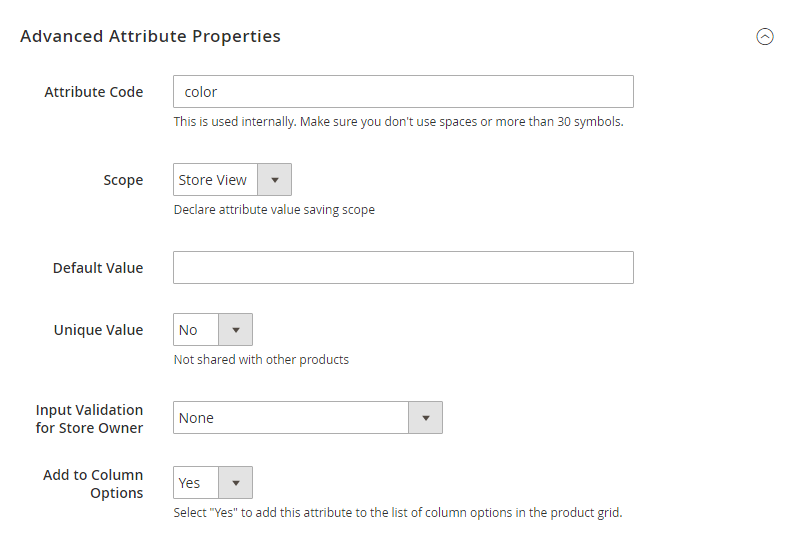
And here's the whole process in 4 steps:
- you enter the “Attribute code” (of no more than 30 characters)
- you'll choose whether your attribute will get displayed globally, across the website or on Store View (the 3 regions on your site, listed in the “Scope”, that you get to select from)
- add the “Unique Value” in case you don't want this property to get applied to other product attributes, as well
- select the data type to be entered into the text field, scanning through the list presented to you on the “Input Validation for Store Owner”
And these are the input types that you can choose from: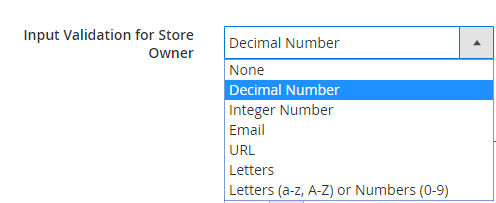
Step 3: Manage Field Labels
Now it's time to insert the field label:
- just open the “Manage Labels” section
- next open the “Manage Title” section, as well
- then enter the “Title” to be used as a label for that specific field; in case your store supports multiple languages, you'll need to enter the translated title for each view
Step 4: Define the Storefront Properties
A main step to give special attention to when you're creating and managing product attributes in Magento 2 is describing your storefront properties. And here's the step-by-step process: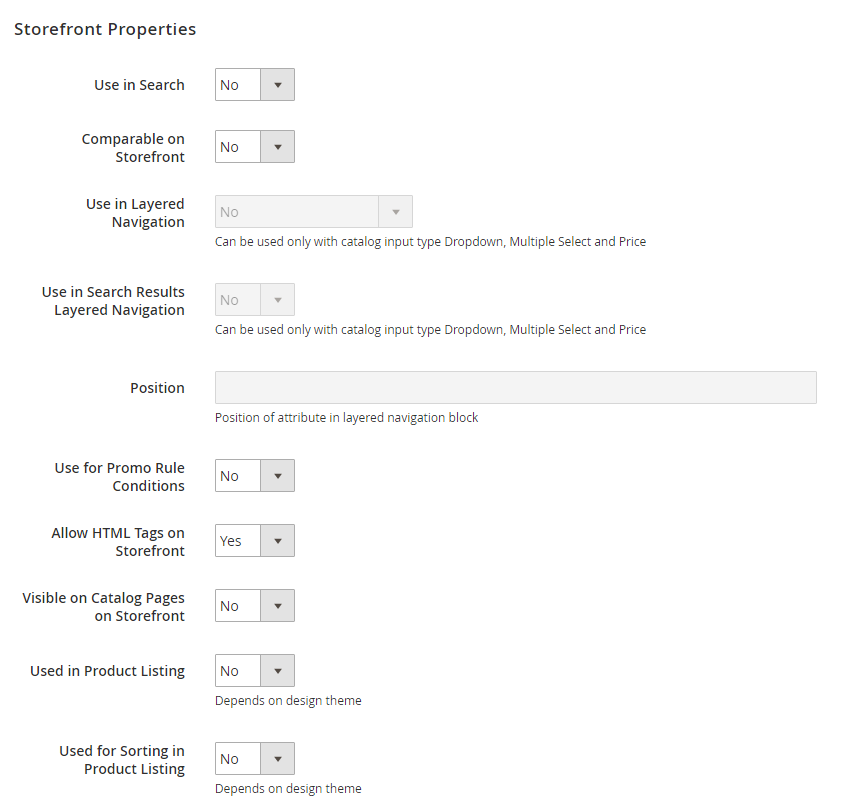
- scan through the listed “Store Properties”
- click Yes for the “Use in Search”, thus enabling it to get ready for searching the attributive
- choose “Yes” for “Comparable on Storefront” and allow product attributes comparisons in “Product Compare”
- in case you catalog input field is either Price, Dropdown or Multiple Select, you could choose Yes for the “Layered Navigation”, then “Yes” again for the “Use in Search Results Layered Navigation”, as well (your attribute will then get shown on the results page in layered navigation)
- … next, specify the “Position” of the attribute in the layered navigation block
- then, if you select Yes in the “Use for Promo Rule Conditions” field, the product attribute will get applied to the price rules
- choose Yes in the “Allow HTML tags for Frontend” for enabling the HTML format for your text
- choose Yes in the “Visible on Catalog Pages on Storefront” field if you want to make the product attribute visible in the catalog page listing, as well
- depending on your design theme's settings, you can choose for your attribute to be “Used in Product Listing” and to be “Used for Sorting in Product Listing”, as well
- then just click on “Save Attribute” to “seal” all these configurations
Step 5: Now Go Ahead and Apply The Product Attributes in Magento 2
Here you are now: you've just created your brand new (standard or custom) attribute! Time to add it to your product now:
- Go to Products > Catalog and just click on “add product” (or edit one of the existing products in your store)
- click on “Add attribute” (it's right there, in the top right corner) and it will get applied to your product
- you're now free to manage your attribute to your liking via Multiple Select
The END! Now time to enrich your customers' shopping experience on your website, displaying your products with all the information they need to go ahead with their purchases.